This guide will help you upgrade Open Journal Systems (OJS). It describes the knowledge and tools you will need to upgrade your software, and provides a step-by-step tutorial you can follow.
The instructions below describe how to upgrade OJS when it is running on a LAMP (Linux, Apache, MySQL, PHP) stack. However, these steps can be adapted to upgrade other PKP software (OMP, OPS) as well as perform upgrades in different server environments.
Want to know when new versions are released and what’s new? Read the announcements forum.
Authors: Marc Bria, Clinton Graham, Kaitlin Newson, Andrea Pritt. Dulip Withanage
Do not proceed if you do not have experience with the items listed below. A mistake during upgrade can lead to unrecoverable errors.
In order to use this guide, you will need experience with basic system administration tools, as well as an understanding of the tech stack in your server configuration. You should have:
Before starting your upgrade, you can review docs/release-notes and the release notebook for your upgrade version to learn about important changes introduced in each version. The config.TEMPLATE.inc.php includes a description for most configuration parameters.
Note that an upgrade may take from a few minutes up to several hours depending on the size of your site.
All PKP applications use a variant of Semantic Versioning described as major.minor.revision-build. Each point of the version number describes the kind of changes you can expect.
| Type | Example | Description |
|---|---|---|
| major | 3.x.x-x |
Comprehensive breaking changes that may effect plugins, server configuration and all parts of the software. |
| minor | 3.3.x-x |
Breaking changes that may effect plugins and server configuration. |
| revision | 3.3.3-x |
New features may be added but breaking changes are kept to a minimum. |
| build | 3.3.3-3 |
No breaking changes or database migrations. |
In order to understand the upgrade process, you should first determine the size of the upgrade “jump”. A jump from version 3.3.0-6 to 3.3.0-7 can likely be done with minimal down time. However, a jump from version 2.4 to 3.2 will be a long, complex process with a higher risk of introducing problems.
You should always perform upgrades in a test environment first, even when upgrading from one build to another.
It is not always possible to upgrade from 2.x to any version of 3.x. When performing upgrades from a 2.x version, you should first upgrade to in-between versions. The table below describes the necessary steps.
| From | To | Description |
|---|---|---|
< 2.4.8 |
2.4.8-x |
Before upgrading to 3.x, make sure you are upgraded to the latest 2.4.8-x build. |
2.4.8-x |
3.2.1-x |
You can not upgrade to 3.3.x or later from 2.x |
3.2.1-x |
3.3 >= |
Upgrade from 3.2.1-x to any version 3.3 or later. |
The following tutorial provides a recommended step-by-step process to safely upgrade OJS. However, each installation is different and your server environment might differ substantially. In all cases, you should review and understand the commands before executing them.
During the tutorial, you will see commands for Debian or RHEL Linux systems. You should only run the command appropriate to your server.
The tutorial below uses the following variables to simplify the terminal commands.
| VARIABLE | Default | Description |
|---|---|---|
| WEB_USER | www-data |
Webserver user |
| WEB_GROUP | www-data |
Webserver user’s group |
| OJS_ROOT_PATH | /var/www |
OJS root folder |
| OJS_WEB_PATH | /var/www/html |
OJS web root folder |
| OJS_DB_HOST | db |
Database host’s name |
| OJS_DB_USER | ojs |
Database user |
| OJS_DB_PASSWORD | ojsPwd |
Database password |
| OJS_DB_NAME | ojs |
Database name |
| OJS_BACKUP_PATH | /srv/backup/ojs |
Folder to store your backups |
| OJS_VERSION | ojs-3.3.0-8 |
Version as in the ojs filename |
| DATE | YYYYMMDD-HH:MM:SS |
The current system date and time |
Rewrite the command below to set up these variables with the correct values for your installation.
$ WEB_USER="www-data" && \
WEB_GROUP="www-data" && \
OJS_ROOT_PATH="/var/www" && \
OJS_WEB_PATH="/var/www/html" && \
OJS_DB_HOST="db" && \
OJS_DB_USER="ojs" && \
OJS_DB_PASSWORD="ojsPwd" && \
OJS_DB_NAME="ojs" && \
OJS_BACKUP_PATH="/srv/backup/ojs" && \
OJS_VERSION="ojs-3.3.0-8" && \
OJS_PUBLIC_PATH="$OJS_WEB_PATH/public" && \
OJS_PRIVATE_PATH="$OJS_ROOT_PATH/files" && \
DATE=$(date "+%Y%m%d-%H:%M:%S")
If you’re using a CRON-like application to execute the php tools/runScheduledTasks.php periodically, please disable it or the specific tasks. If you’re using the Acron plugin, then disable the plugin.
After disabling, it’s better to ensure that all tasks had a time to be completed, you can inspect the database, more specifically the scheduled_tasks table, and ensure that the last_run field of all entries points to a date slightly in the past (a couple of hours should suffice to execute everything).
OJS 3.4 introduced Laravel jobs to process long running tasks, and you might also setup a separated task (worker) to execute these jobs out of the request cycle of the application, as explained in the admin-guide. If you’re using the worker, it’s needed to stop it gracefully before starting the upgrade.
The worker can be gracefully interrupted by sending a SIGTERM signal to the PHP process, notice that OJS 3.4.0-5 has introduced a restart command to the worker, which does basically the same.
If you’re using a supervisor-like application to manage the worker, which is recommended, then please refer to its documentation regarding interrupting the applications gracefully.
Before beginning the migration, you should put the site into maintenance mode to ensure that visitors do not see error messages and there are no changes to the database or files while backups are being made. Maintenance mode should prevent all requests from being sent to the application.
OJS does not support a maintenance mode yet, but we plan to support it.
Modify your Apache VirtualHost directive or place an .htaccess file in the OJS_WEB_PATH with the following content.
order deny,allow
deny from all
ErrorDocument 403 "This site is undergoing maintenance and should return shortly. Thank you for your patience."
Reload the apache server to apply the changes:
(Debian)$ service apache2 reload

(RHEL)$ systemctl restart httpd
Do not skip this step. An upgrade can fail for many reasons. Without a backup you may permanently lose data.
The steps below will backup the following folders and files.
| Common Path | Description | VARIABLE |
|---|---|---|
/var/www/html/public |
Public files | OJS_PUBLIC_PATH |
/var/www/files |
Private files | OJS_PRIVATE_PATH |
/var/www/html/config.inc.php |
config.inc.php |
|
/var/www/html/.htaccess |
.htaccess or vhost (if any) |
|
/var/www/html/plugins |
plugins | |
| locale files, custom code, etc. | local customizations |
Backup the database.
$ mysqldump --host="$OJS_DB_HOST" -u $OJS_DB_USER -p$OJS_DB_PASSWORD $OJS_DB_NAME --result-file="$OJS_BACKUP_PATH/backupDB-$DATE.sql"
Character encodings are a common source of database problems during upgrades.
Read more in the Admin Guide.
Backup the private file directory.
$ tar cvzf "$OJS_BACKUP_PATH/private-$DATE.tgz" "$OJS_PRIVATE_PATH"
Backup the public files directory.
$ tar cvzf "$OJS_BACKUP_PATH/ojsfiles-$DATE.tgz" "$OJS_WEB_PATH"
Backup any other customizations you have made to the software, such as custom plugins or locale files.
Use your backup to create a sandbox environment and test the upgrade in that sandbox first. The steps below can be used in your sandbox environment to perform an upgrade.
Once the test is complete, you can run any automated or manual tests you have configured to ensure the upgrade did not introduce regressions.
Only perform the next steps on your live, production environment if you have already completed a test upgrade in your sandbox environment.
Download the correct release package.
$ cd "$OJS_ROOT_PATH"
$ wget "https://pkp.sfu.ca/ojs/download/$OJS_VERSION.tar.gz"
Check the README file from the downloaded tar.gz and be sure your system meets the following requirements.
In addition, you will want to perform the following checks.
Backup the application files.
$ mv "$OJS_WEB_PATH" "$OJS_BACKUP_PATH"
Extract the release package.
$ mkdir "$OJS_WEB_PATH"
$ tar --strip-components=1 -xvzf "$OJS_VERSION.tar.gz" -C "$OJS_WEB_PATH"
Restore the config.inc.php file.
$ cp "$OJS_BACKUP_PATH/html/config.inc.php" "$OJS_WEB_PATH"
Run the following command to compare your configuration file with the template of the new release. Add or remove any configuration options as necessary.
$ diff "$OJS_WEB_PATH/config.inc.php" "$OJS_WEB_PATH/config.TEMPLATE.inc.php"
Restore the .htaccess file if it exists.
$ cp "$OJS_BACKUP_PATH/.htaccess" "$OJS_WEB_PATH"
Restore the public files.
$ cp -r "$OJS_BACKUP_PATH/html/public/*" "$OJS_PUBLIC_PATH"
Set the permissions of new files as required by your server configuration.
(Debian)$ sudo chown -R $WEB_USER:$WEB_GROUP "$OJS_PUBLIC_PATH" "$OJS_WEB_PATH/cache/"

(RHEL)$ sudo chown -R apache:apache "$OJS_PUBLIC_PATH" "$OJS_WEB_PATH/cache/"
Set the permissions for the plugin directories as required.
(Debian)$ sudo chown -R $WEB_USER:$WEB_GROUP "$OJS_WEB_PATH/plugins/"

(RHEL)$ sudo chown -R apache:apache "$OJS_WEB_PATH/plugins/"
If the server is running under SElinux, reset the file contexts.
(RHEL)$ sudo restorecon -R "$OJS_WEB_PATH/"
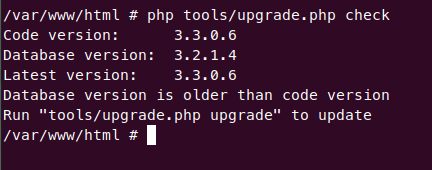
Confirm the version numbers match your expectations.
$ php tools/upgrade.php check
In the screenshot below, we can see that we are currently running 3.2.1-4 and will be upgrading to 3.3.0-6.

Finally, when you are ready, run the upgrade script, which may take several hours to complete. We recommend you specify an explicit amount of memory on the command line, as server defaults may be too low. If the upgrade process runs out of memory it will fail and you will need to restore from backup and begin again. You may also wish to log the output.
$ php -d memory_limit=2048M tools/upgrade.php upgrade
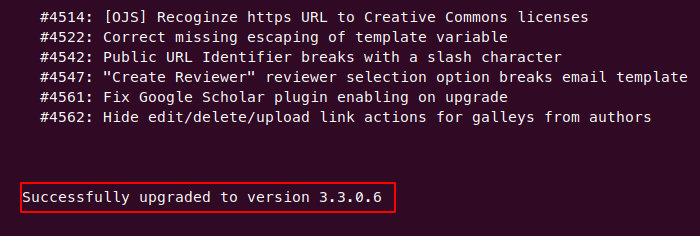
If the upgrade is successful, you will see the message below informing you that the upgrade was successful.

The upgrade script will print a lot of information to the terminal. We recommend sending the output to a log file. This will help you troubleshoot if the upgrade fails.
$ nohup php tools/upgrade.php upgrade > $OJS_ROOT_PATH/upgrade.log &
Check the progress of the upgrade.
$ tail -f $OJS_ROOT_PATH/upgrade.log
When the upgrade is complete, remove the maintenance mode previously configured by modifying your Apache VirtualHost directive or updating your .htaccess file.
$ cd "$OJS_WEB_PATH/"
$ mv .htaccess .htaccess.disabled
If your PHP timeouts and/or memory limit were adjusted, restore their original values.
Reload the apache server to apply the changes.
(Debian)$ service apache2 reload

(RHEL)$ systemctl restart httpd
It’s important to test the site after an upgrade. Any core functions for your journals should be tested, as well as custom plugins or themes once they have been reinstalled.
The following is a short checklist that covers common use cases.
Use the Plugin Gallery to restore any custom plugins that were installed.
If you have installed custom plugins which are not in the Plugin Gallery, check with the plugin distributor for an update which is compatible with your upgraded version.
Basically undo the steps of the item 2, by reenabling the scheduled tasks and the job worker (if you were making use of it).
You may wish to retain your backup files, but if you don’t, you can remove them.
$ sudo rm -fR "$OJS_BACKUP_PATH/*"
Your OJS instance has been successfully upgraded. Congratulations!
Consult the following resources if you encounter any problems.
Copyright: Simon Fraser University holds the copyright for work produced by the Public Knowledge Project and has placed its documentation under a Creative Commons Attribution 4.0 International License.