Now that you understand the basics of GitHub, this chapter explains how to add new documents and edit documents in the repository.
In General: While any name you create should work, it’s best to keep titles short and descriptive. Always replace spaces between words with a dash.
Titles: Some example titles include: learning-ojs, pkp-theming-guide, crossref-ojs-manual. Remember that titles are part of the file path in the URL to individual docs so keep it simple.
Chapters: You might be tempted to number chapters, but if we ever need to create new chapters in between existing ones, we would need to re-number. It’s best to keep chapters in the same style as title-level names. Some examples for chapters include: getting-started.md, troubleshooting.md, data-import-and-export.md.
Images: Store all images in a single “assets” folder within the language you’re working (e.g.: en/assets/). Keep your image titles brief or with abbreviations and consistently named, so they’re easy to locate. Depending on how many images you have, numbering these might be a lot more convenient while working on the document. Listen to your heart. Some examples include: contrib-01.png, authoring-images-01.png. If you’re putting all your images into only the asset folder, it’s a good idea to name your images to correspond with chapter titles.
Note that file names are case sensitive, so if the image is saved as learning-ojs3.1-jm-settings-workflow-email-templates.png and you reference Learning-OJS3.1-jm-settings-workflow-email-templates.png in the document, the image will not display.
When you create a new document, you need to decided whether to make it a single page document or multi-page document, as they are significantly different. Most guides in the Documentation Hub are multi-page documents, which means that each chapter is a different file. However, some short guides are single-page documents.
Single page documents are rendered fully from one Markdown file. The table of contents on the side of the page is created using the header tags in Markdown. For example:
## The "Documentation Hub"

### Single Page Docs
To create a new single page document in GitHub:
index.md.---
generateHeadingToc: true
showPageTOC: true
---
From here, write the document out as you would using Markdown. Any level two header (e.g.: ## text) displays on the table of contents on the left as a chapter. Any level three header (e.g.: ### text) displays as a sub-chapter. Levels four and up do not display on the sidebar table of contents.
Headings should never skip a level. Do not jump from
## Heading(2) to#### Sub-heading(4). It is important that a sub-heading of## Heading(2) is### Heading(3) for accessibility.
Multi-page documents, like Learning OJS 3, are more robust directories with folders for individual languages/translations, and a single Markdown file for every chapter of the document. They also contain a file called SUMMARY.md that creates the table of contents for the document and a file called README.md that serves as a first/landing page for your document. To create a multi-page document start with the following:
index.md.
index.md file should contain a description of the document. Look to other documents as examples. Also, if the document is available in more than one language, they should all be linked from this page.---
isBookIndex: true
---
Unlike with a single-page document, you no longer need to add to index.md. The rest of your document steps should be as follows:
SUMMARY.md
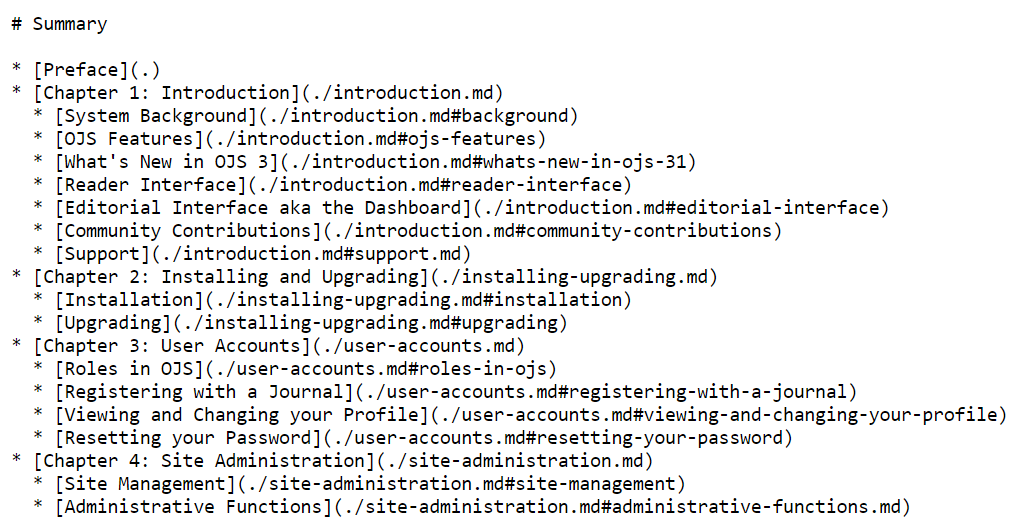
SUMMARY.md is the file that determines the display of the table of contents for your document. The Markdown list hierarchy determines the nesting of contents titles in your sidebar. Each chapter title is written as a link to either a single Markdown file per chapter or as a link to a specific heading within that Markdown file. You can fill in all of the chapter and section links after you have created the chapter files.
- [Statistics](statistics.md)- [Definitions](./statistics.md#definitions)The next step is to create a README.md file in the language folder for the document. The README file is the main landing page of the document and should contain summary introduction information about the document, so users know what the document is about. It should also contain relevant keywords and descriptive metadata so that users can find the document by searching and the document ranks high in Google search results about the document topics.
Add Title and Description front matter (metadata) to the document, with the Markdown formatting shown in the example below.
:, they should be put into quotes.Example:
---
title: Technical Documentation - OJS|OMP|OPS
description: A technical guide to the coding conventions and application architecture for Open Journal Systems and Open Monograph Press.
---
Example with quotes:
---
title: 'Learning OJS 3.3: A Visual Guide to Open Journal Systems'
description: A comprehensive visual guide to all basic functions and configurations related to publishing scholarly articles in Open Journal Systems (OJS).
---
Below the front matter, add the H1 title for the page. Since this will be the introduction chapter, the title should be “Introduction: [Document Title.]. For example:
# Introduction: Technical Documentation for OJS, OMP, and OPS
Now you can add text to the README file. This will be the introduction chapter. It should start with a concise 1-paragraph summary of what the document is about. Then add up to 4 additional paragraphs that further summarize the document’s content, including an explanation of who the guide is for and which software applications or versions it applies to. Make sure the text includes all main topics of the document and relevant keywords.
If you want to include extensive background information about the guide or introductory content that exceeds 5 paragraphs or 300-500 words, create a separate chapter for this content with an appropriate title.
Save the README file when it is complete.
Next you can create a separate file for each chapter in the guide and add content to each chapter. Each full chapter of a multi-page document should be a single Markdown file.
Every chapter file should have Title front matter (metadata), which can include the document title, and Description front matter, which should give a summary of the document and include main keywords that would be searched. For example, if the document is “Designing Your OJS Journal” and the chapter is “Inclusive and Accessible Theming,” the Title could be as follows:
---
title: Inclusive and Accessible Themes - Designing Your OJS Journal
description: How to develop inclusive and accessible themes for OJS, including colour, alt text, URLs, and page structure
---
If the title contains a : character, then the title should be put into quotes, for example:
---
title: 'Learning OJS 3.3: A Visual Guide to Open Journal Systems'
---
Then add an H1 chapter title and your chapter content below. For any subheadings use descending header tags (H2 to H5). Do not skip a level of header tag, as this affects accessibility.
Once you have created all of your chapters, you can add links to those files in the SUMMARY.md file, which essentially creates a table of contents for the document. Whereas your headers in single documents create the sidebar table of contents, in multi-page docs, you need to add the headers manually to the SUMMARY.md file.
In the SUMMARY.md file, add a link for each chapter title and H2 subheading links below the chapter links.
The first link should be for the Introduction in the README file:
* [Introduction](.)
Adding images to your documentation helps users more easily locate the features you are writing about. Images should go in a folder named assets. The type of document you’re working on changes where you will find the assets folder.
/contributing/assets//learning-ojs/en/assets/To add new images to a document, you will need to take and save these screenshots locally. Make sure to follow the naming convention for images.
New assets can be added before working on a document or after it has been completed.
To add assets to a document and assets folder:
“”

While you’re editing a document you may find that you need to replace an image with an updated screenshot. This might be the case with version updates.
First, take the new screenshot and update the link to the screenshot in the document.
learning-ojs3.2-jm-settings-workflow-comp
If you’ve replaced images and there is no longer a use for the previous saved asset, the old assets can now be deleted. Before deleting the old assets, look through the chapter to make sure that these are not being used in other sections of the document. If so, update the other links with the new file name. You can then delete the old assets from your branch and create a pull request.
Informative images such as screenshots need to have alt text (“alternative text”). Alt text is a machine-readable tag that describes an image in words if the image cannot be viewed for any reason, including slow internet connection, error in the HTML code, or the use of assistive technology.


For further instructions and examples see WebAim’s Alternative Text guide.
To embed a YouTube video in a Markdown file, you can use the following formatting, replacing the id with your video’s id (found in the URL of your video) and the title with the title of your video. Unlike images, you should include “Video of…” in your title so a screen reader announces that it is a video.
{% include video.html id="ny0pue6MKek" provider="youtube" title="Video of how to create a new role in OJS"%}
If you have a video file that you want to embed in a document, you will need to upload the file to the assets folder for your document, similar to the steps in the image upload process.
Once you have uploaded the video file, you can embed it by adding a <figure> in your Markdown file similar to the example below, replacing the filename and caption with your own. Unlike images, you should include “Video of…” in your caption so a screen reader announces that it is a video.
<figure class="video_container">
  <video controls="true" allowfullscreen="true">
    <source src="./assets/contrib-01.mp4" type="video/mp4">
  </video>
  <figcaption>Video of the file edit menu in GitHub.</figcaption>
</figure>
To create an asset folder within the document branch, you will need to create a new file by clicking ‘Create new file’ in your repository.
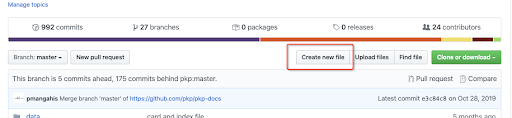
This will prompt you to another page where you can edit a new file. On the top you will see:

Here you will enter the main document folder and the subsequent folders. This will vary depending on whether you are creating an asset folder for a single on multi-page document.
Begin by entering the main folder name followed by ‘/’. You will do this until you reach the subfolder you want to create your asset folder within.In a single-page document the asset folder might be created as the second level folder (i.e., pkp-docs/contributing/assets/). In a multi-page document the asset folder might be created within the language folder of the document you are working on. (i.e., pkp-docs/learning-ojs/en/assets/).
Multi-page Example:

For this example, I have created an assets folder within the en folder of learning-ojs.
Single-page example:

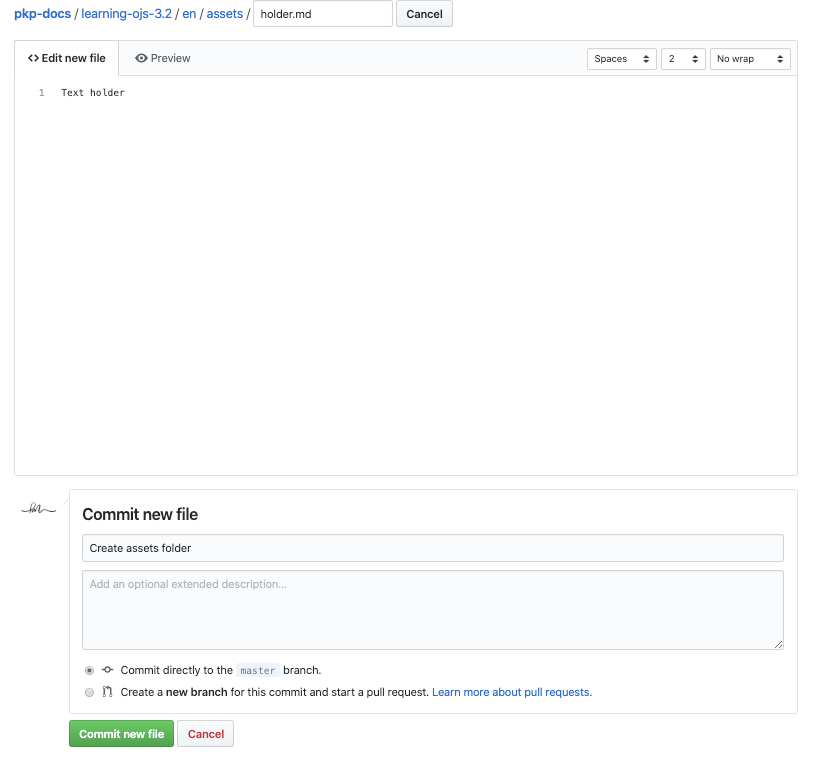
As GitHub will not allow you to create a blank folder, you will need to create a document in the asset folder. Remember that document pages need to end with ‘.md’
This can be labelled as anything, as it will be deleted after you’ve uploaded your assets. Enter some text into the textbox and commit the change to the file.
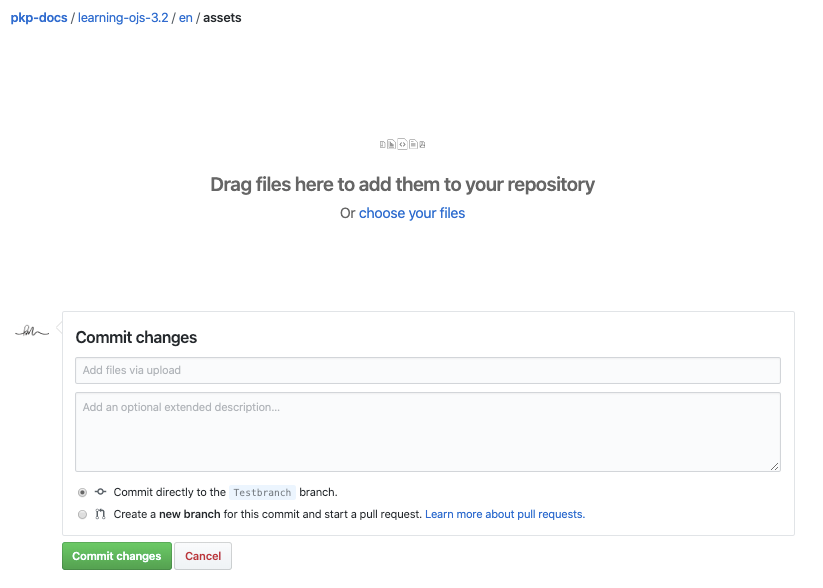
You should find your newly created assets folder within the main document folder. Click upload files on the top right corner.

Add your assets using drag and drop or by clicking ‘choose your files’
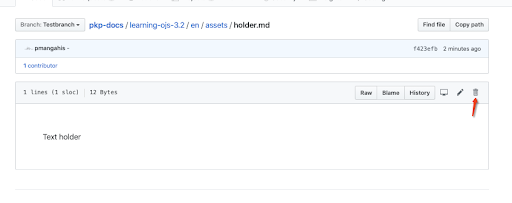
Once you’ve uploaded assets into your assets folder you can go ahead and delete the holder document file you created, by clicking the file name followed by trash can icon on the top right corner.
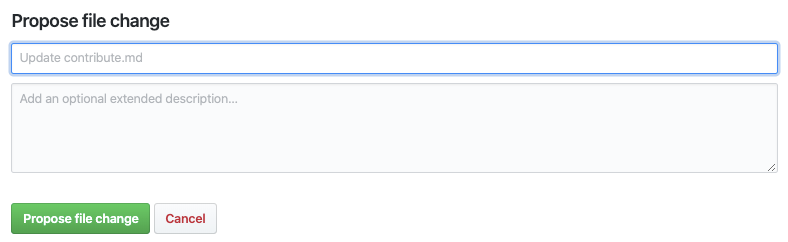
Once you’ve completed the made edits to the file, you will scroll down and fill the information in the text boxes and click ‘Propose file change’.
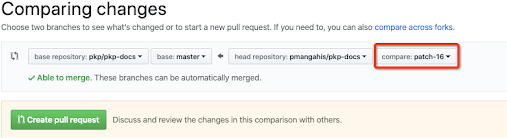
This will bring you to another page that compares the changes you’ve made.

The fourth box (highlighted in red) is the branch that’s automatically created by GitHub.
Click ‘Create pull request.’
This page is where you would enter a more detailed description of what you changed. You might want to do this if you need to justify your changes or need to let everyone else know that a change is significant.
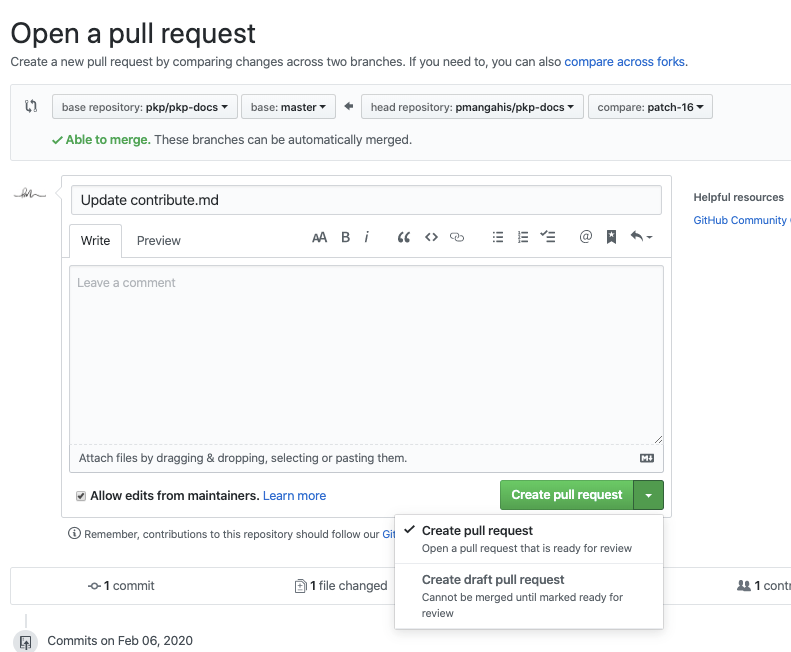
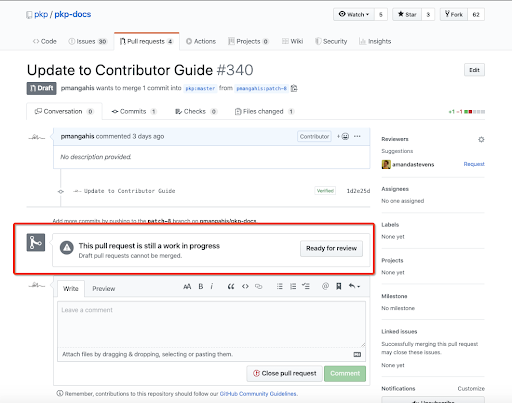
In this final page, you also have the option to create your pull request or create a draft pull request. A pull request indicates that you have completed your changes and lets the PKP team members know to review your changes. Meanwhile, a draft pull request allows you to continue to make changes.
If you are a member of the PKP team, you’ll see the ability to commit directly to the main branch. It’s important to note that these changes are immediate, but they are also unreviewed. Please do not commit directly to main. We recommend that you always commit code via pull request and have someone else review it.
Once you’ve created a draft pull request, you can continue making changes to the document you’re working on at any time. It will be important to note which branch is created for that particular document, especially if you have multiple branches in your repository.

Again, the branch that has been created will be listed on the forth box in the Comparing changes page when generating a pull request.
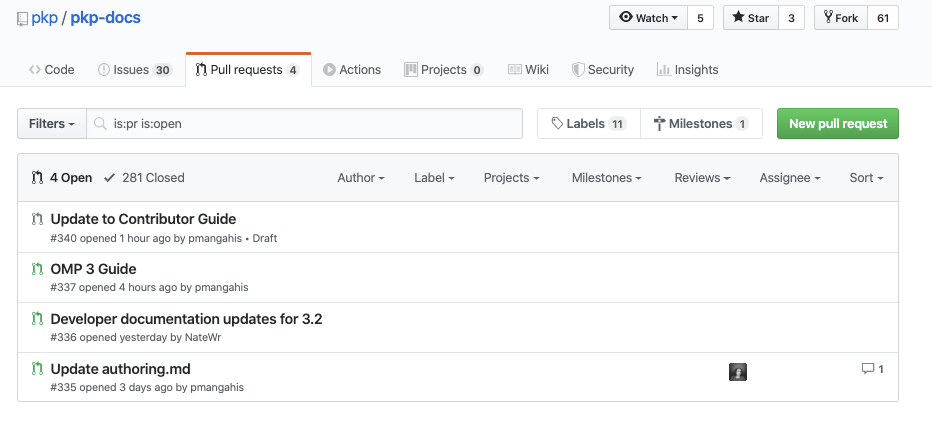
You can also find out the branch by looking at the PKP Repository, pull request tab. Any active pull requests made can be found in the pkp repository page under pull request. Here you will find both draft pull requests and pull requests made.
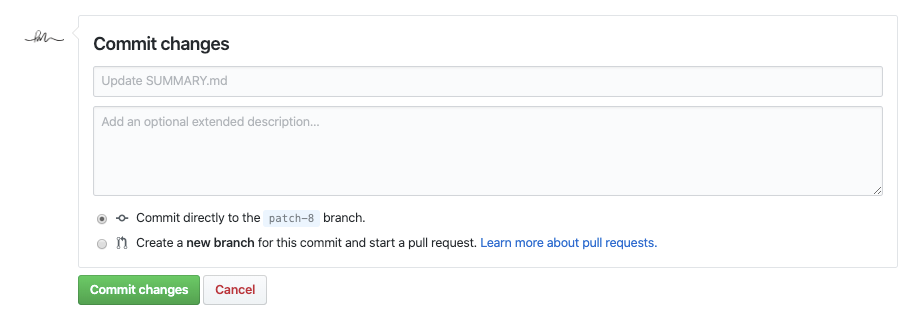
From your own repository, you will want to select the correct branch and continue making the changes to the document. After making these changes and providing the details of the changes in the textbox. You will want to select the first option to ‘Commit directly to the branch’.
You will repeat this step until you’ve complete making your changes.
Once you’ve completed making the changes to your document. You can now go back to the draft pull request you created and click ‘Ready for Review.’